Plotting
The openpytea.plotting module wraps matplotlib to produce
publication-quality figures using the SciencePlots style. All functions return
a (fig, ax) tuple — a matplotlib.figure.Figure and a
matplotlib.axes.Axes — so you can further customize or save the
figure directly.
To see the outputs of all code examples below, refer to the walkthrough notebook.
Cost breakdown charts
Stacked bar charts visualize cost structure data returned by the *_data
helper functions in openpytea.analysis.
from openpytea.analysis import (
    direct_costs_data,
    fixed_capital_data,
    fixed_opex_data,
    variable_opex_data,
)
from openpytea.plotting import plot_stacked_bar

# Equipment-level direct costs
equip_data = direct_costs_data(plants=plant)
fig, ax = plot_stacked_bar(equip_data)

# Capital cost breakdown (ISBL, OSBL, D&E, Contingency)
capex_data = fixed_capital_data(plants=plant)
fig, ax = plot_stacked_bar(capex_data)

# Fixed OPEX breakdown
fopex_data = fixed_opex_data(plants=plant)
fig, ax = plot_stacked_bar(fopex_data)

# Variable OPEX breakdown
vopex_data = variable_opex_data(plants=plant)
fig, ax = plot_stacked_bar(vopex_data)
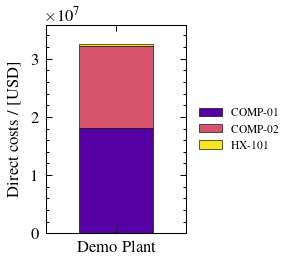
|
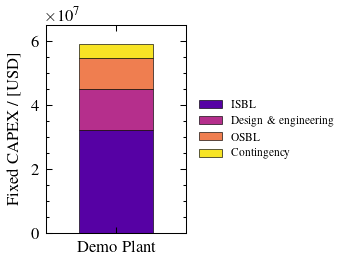
|
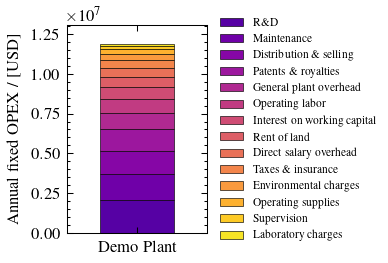
|
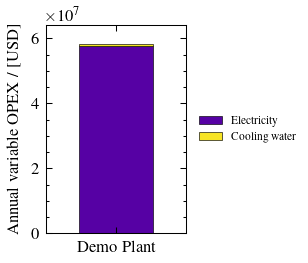
|
Levelized cost breakdown
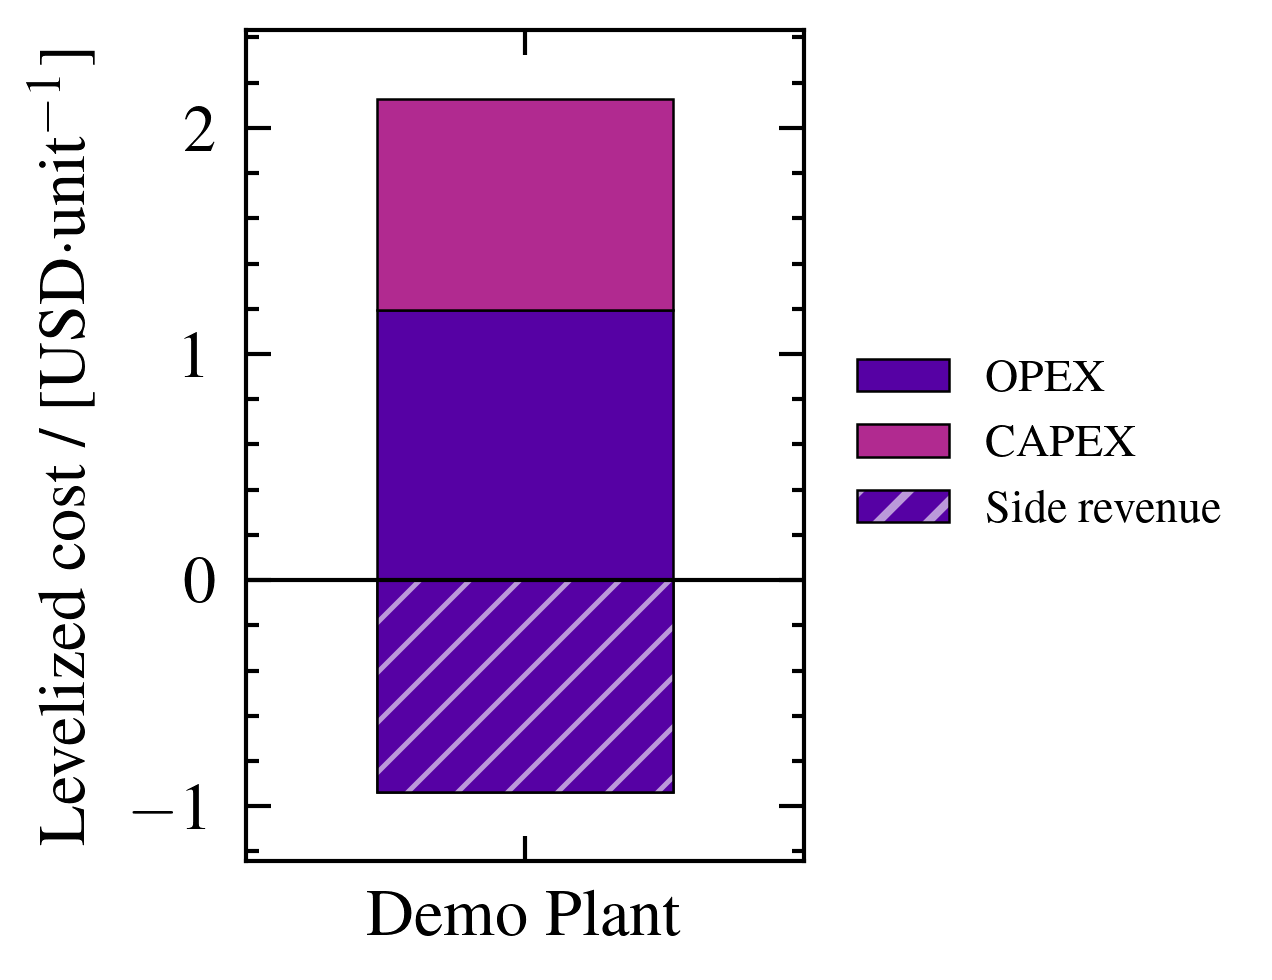
levelized_cost_data() feeds the same
plot_stacked_bar() function, but its “Side revenue” component (stored
as a negative value) is rendered as a waterfall-style base below zero
instead of stacking like a normal cost — so CAPEX and OPEX still stack up
to the true net LCOP at the top of the bar. The side-revenue segment reuses
the color of the largest stacked component, distinguished only by a hatch
pattern, so the CAPEX/OPEX ratio stays easy to read.
from openpytea.analysis import levelized_cost_data
from openpytea.plotting import plot_stacked_bar

lcop = levelized_cost_data(plants=plant)
fig, ax = plot_stacked_bar(lcop)
Cash flow diagram
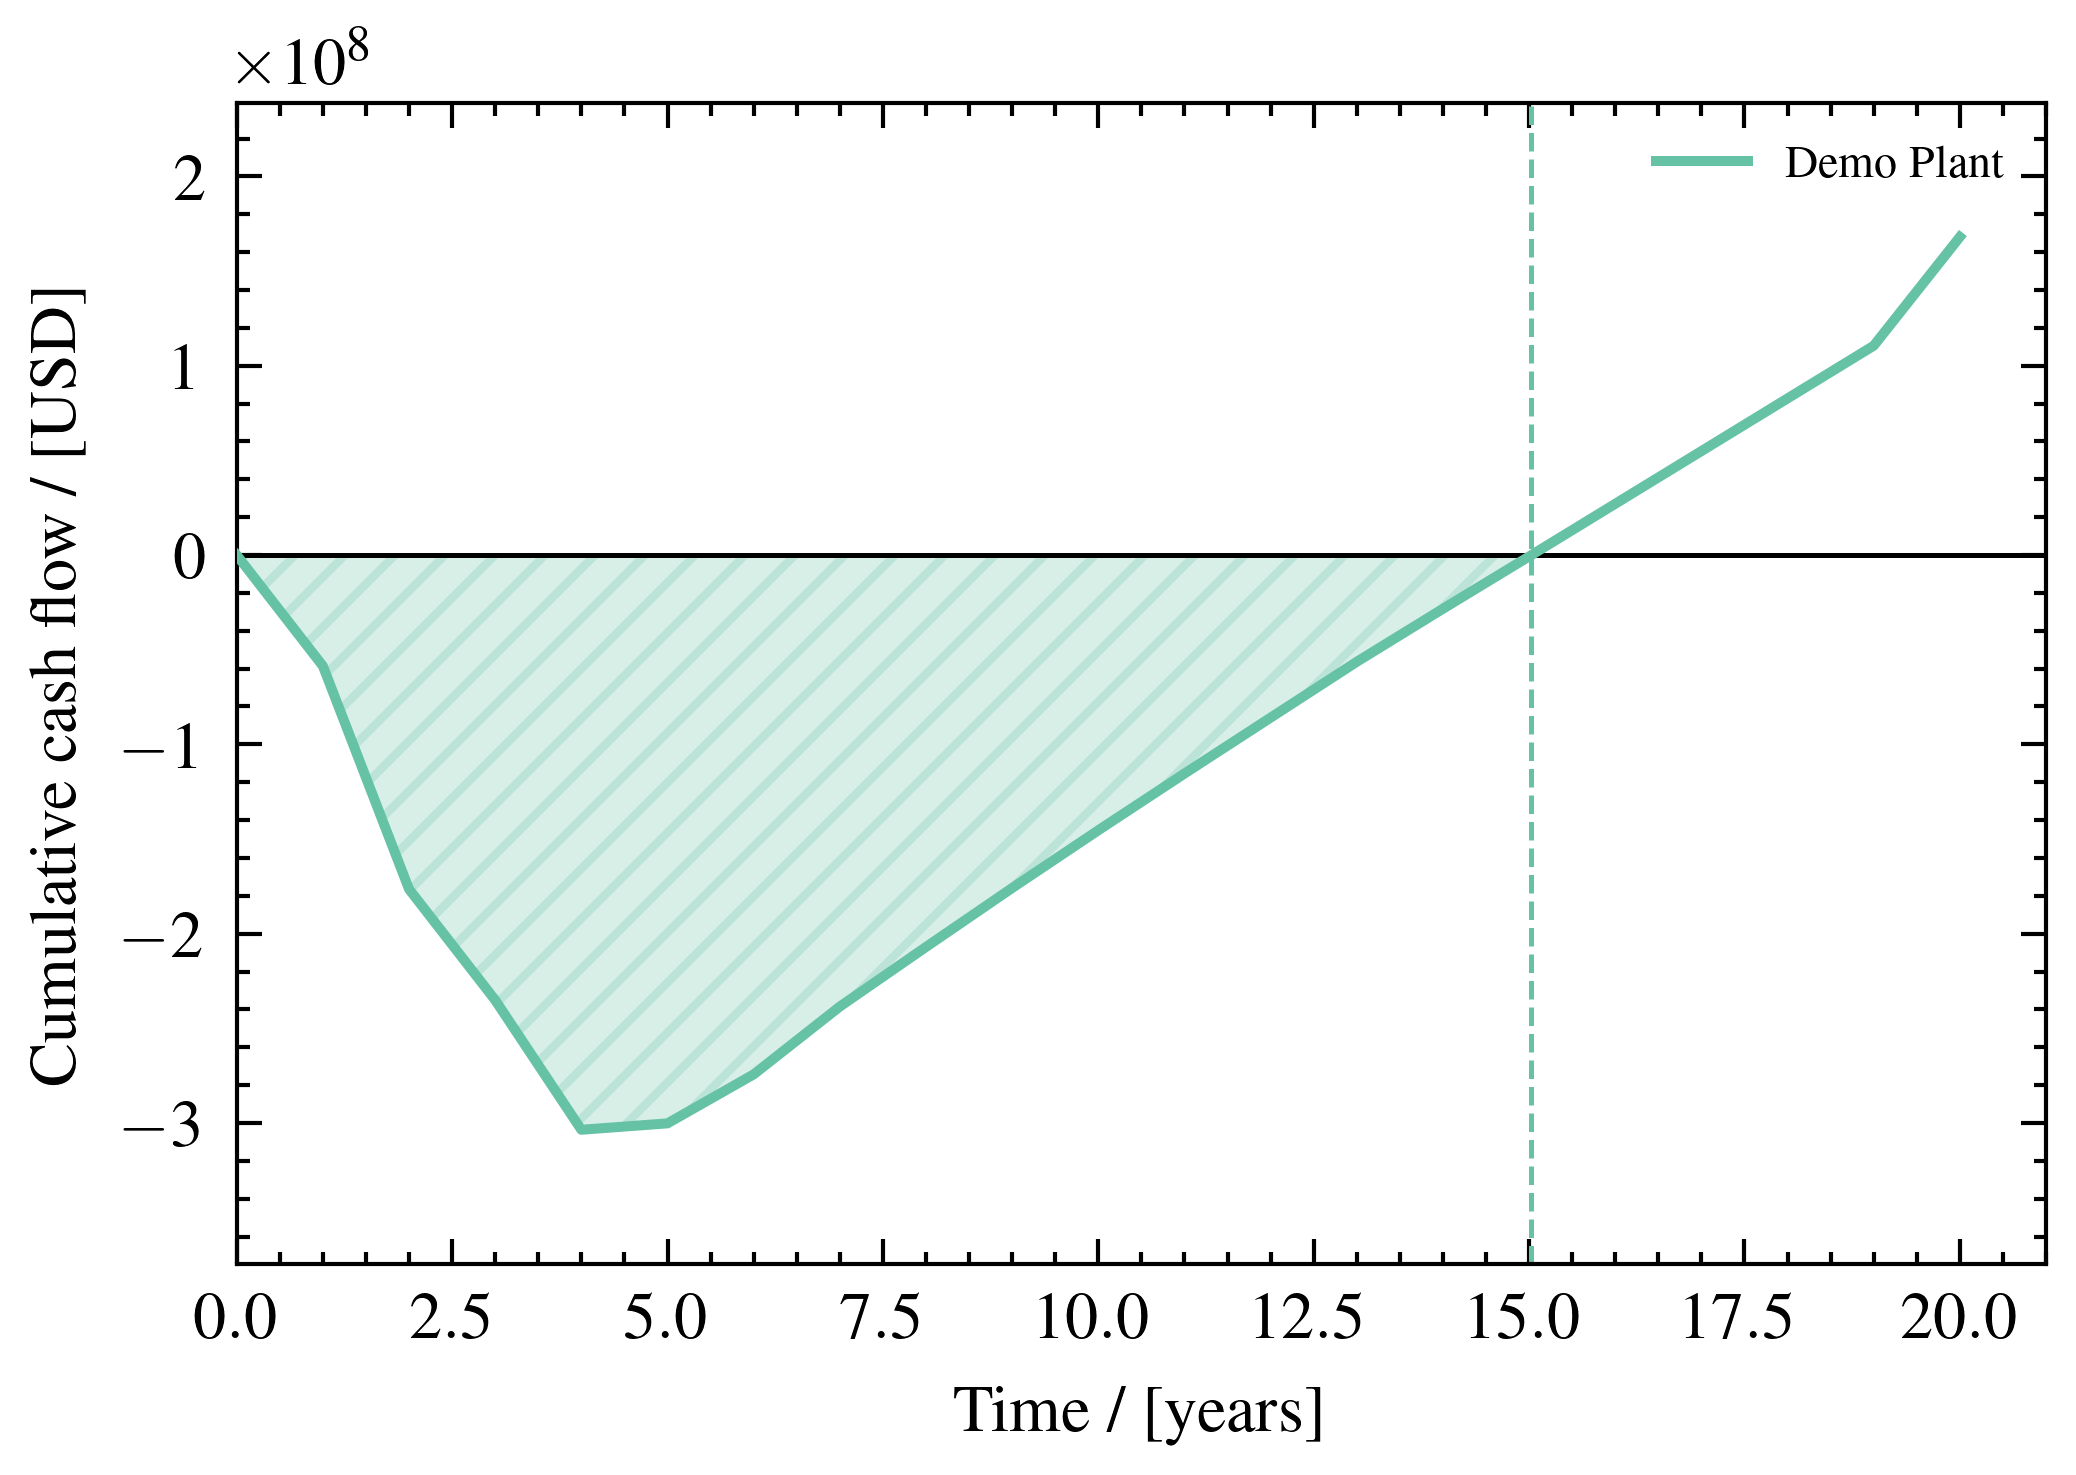
plot_cash_flow() draws the classic cumulative
cash flow curve: a dip into debt during construction/start-up, a minimum
(“maximum investment”), a break-even point where the curve crosses back
above zero, and a climb into profit for the remainder of the project life.
The region where the cumulative cash flow is negative is shaded (hatched)
as debt, and the break-even point (if any) is marked with a dashed
vertical line in the same color as the curve.
from openpytea.analysis import cash_flow_data
from openpytea.plotting import plot_cash_flow

cash_flow = cash_flow_data(plant)
fig, ax = plot_cash_flow(cash_flow)

fig.savefig("cash_flow.pdf")
Comparing multiple plants
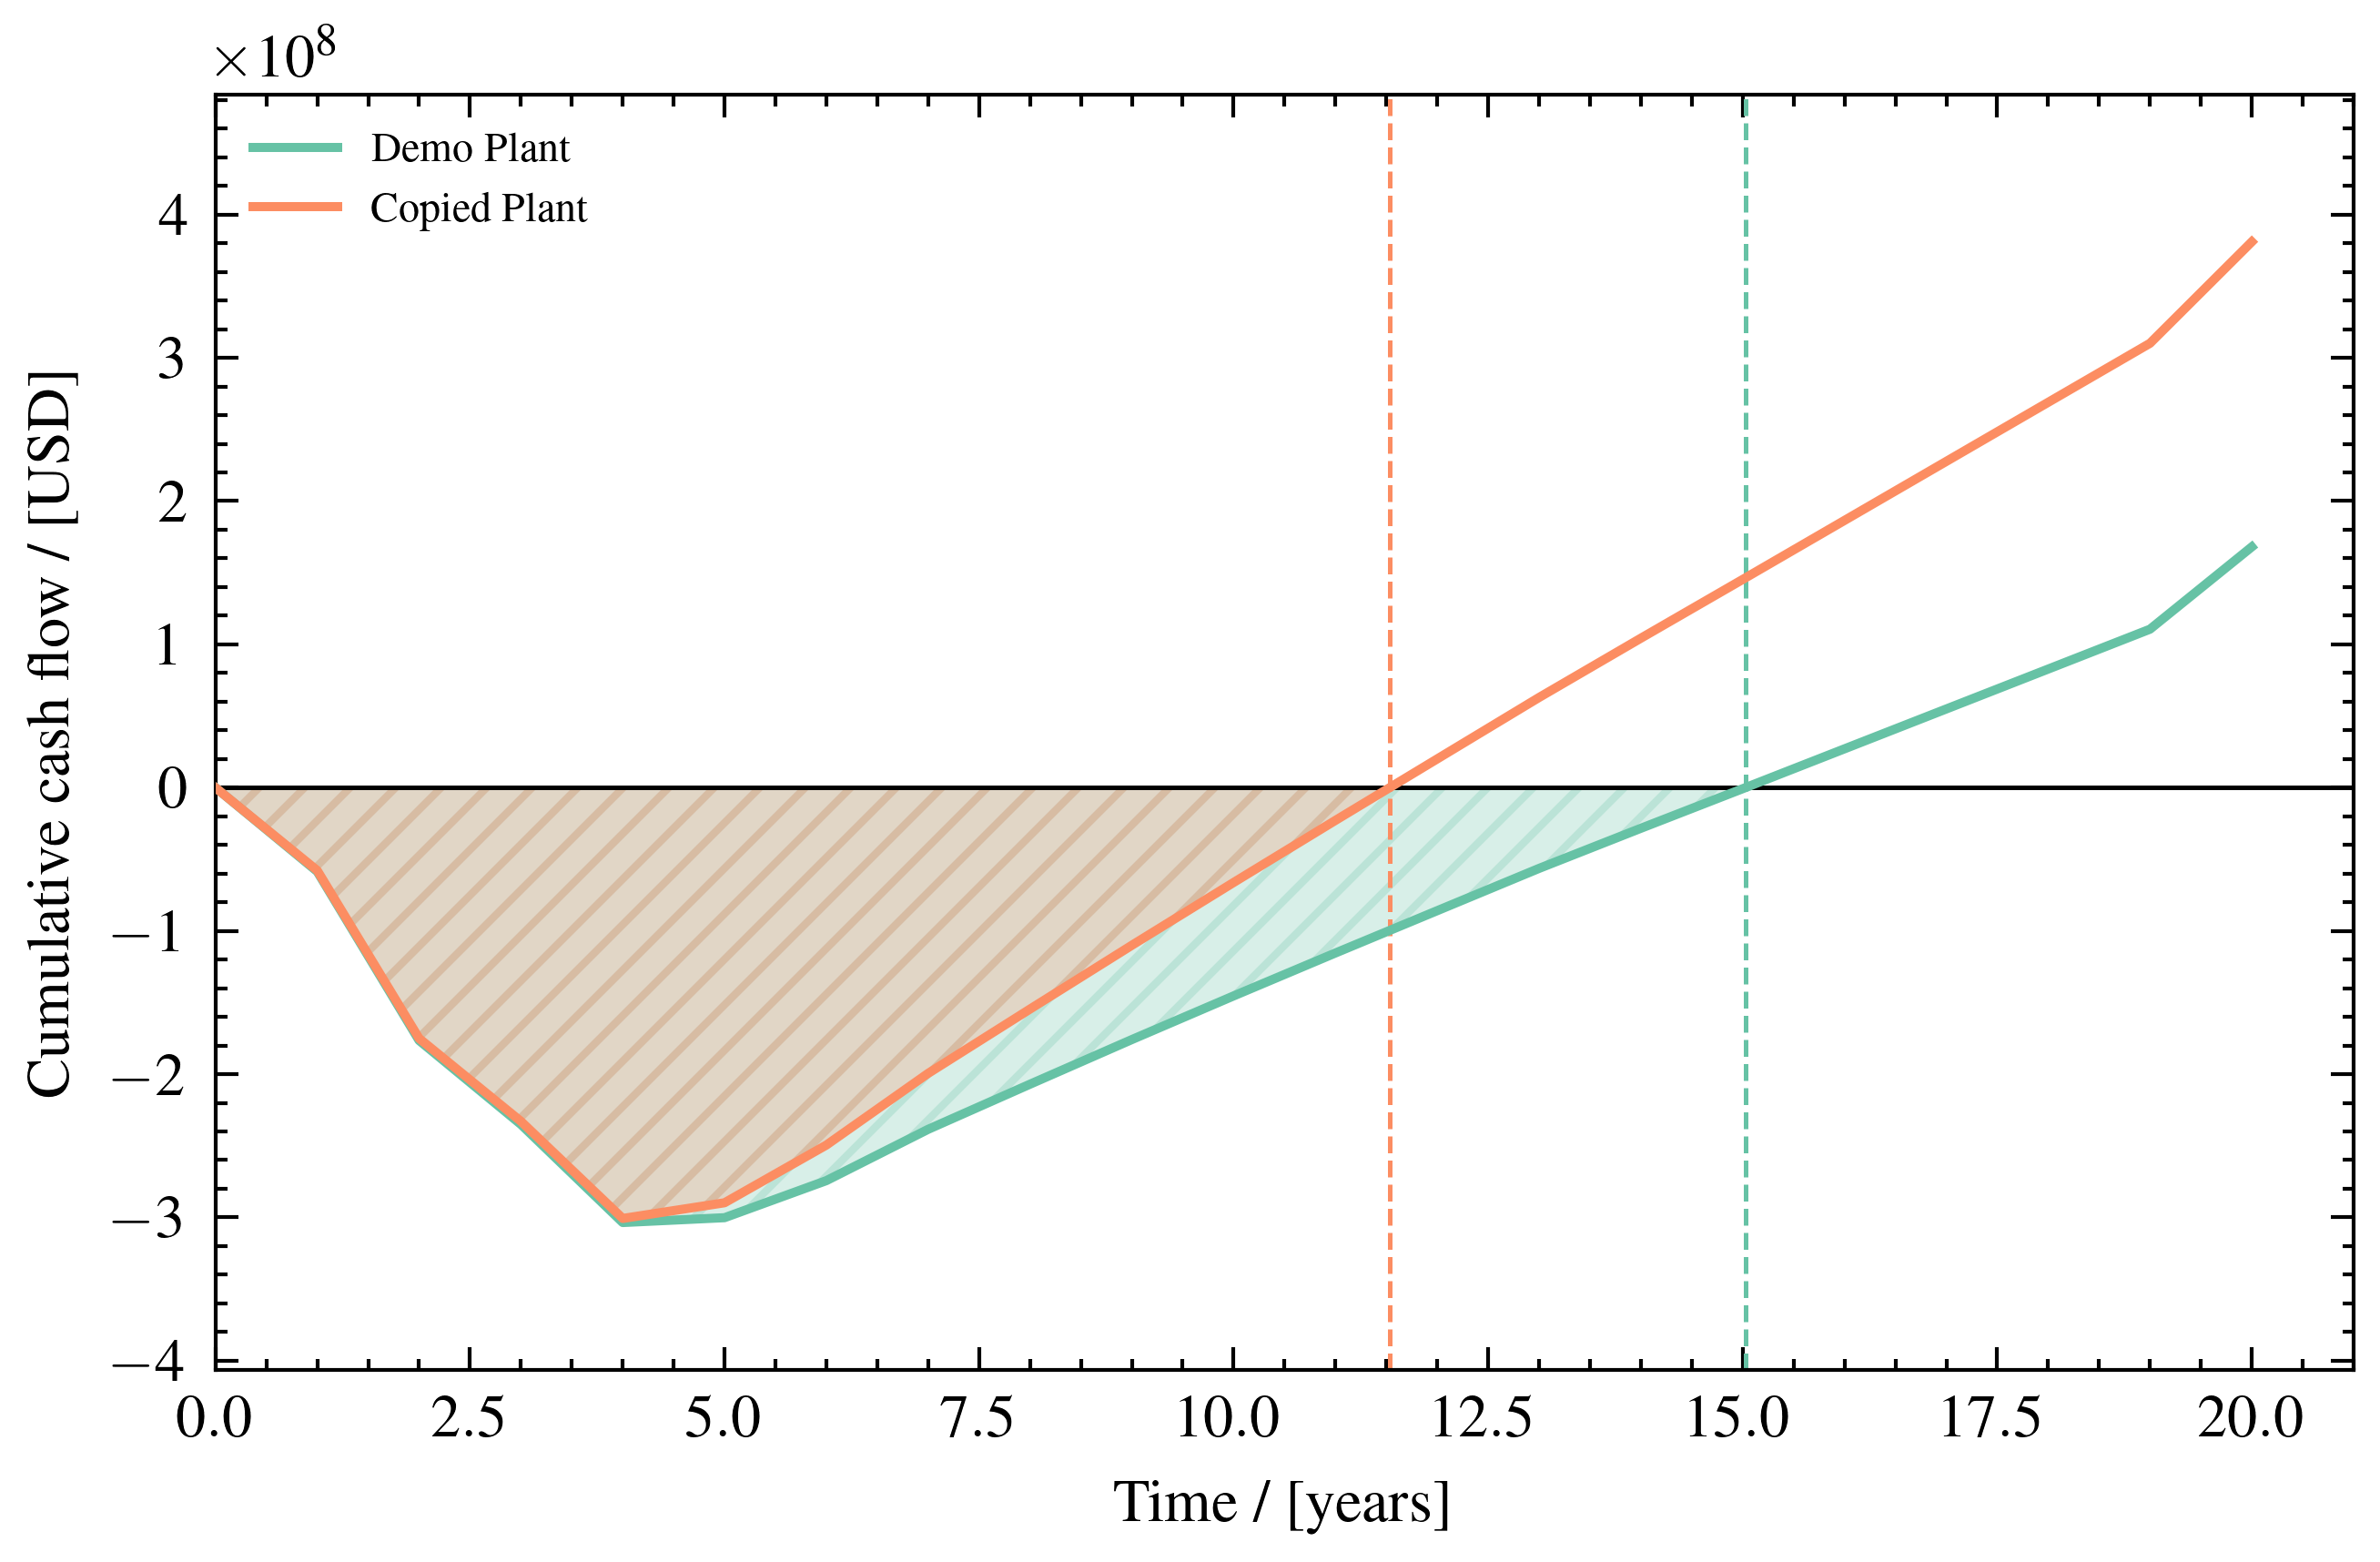
Pass a list of plants to cash_flow_data() to
overlay their cumulative cash flow curves — each with its own shaded debt
region and break-even line — for direct comparison:
cash_flow_multi = cash_flow_data([plant, plant_b])
fig, ax = plot_cash_flow(cash_flow_multi, figsize=(4.5, 3))
Sensitivity plots
from openpytea.analysis import sensitivity_data
from openpytea.plotting import plot_sensitivity

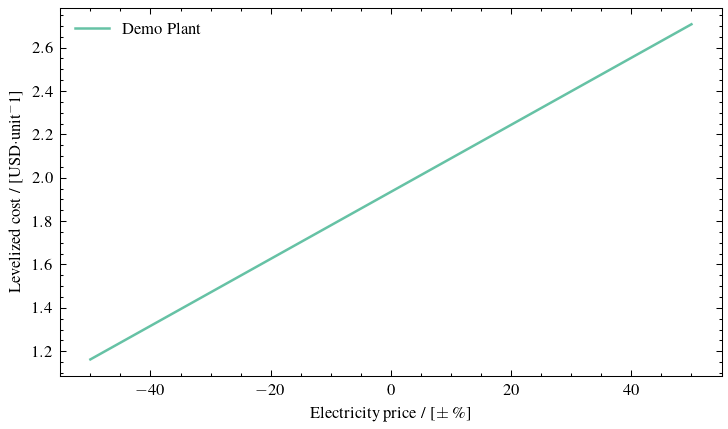
# Vary electricity price ±50 % and plot LCOP
sens = sensitivity_data(plants=plant, parameter="electricity", plus_minus_value=0.5)
fig, ax = plot_sensitivity(sens)

fig.savefig("sensitivity.pdf")
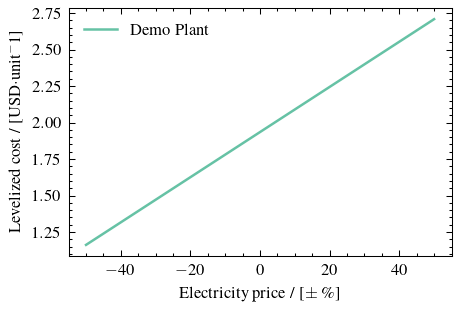
Axis labels and the legend are set automatically from the data returned by
sensitivity_data(). Pass a custom figsize to
resize the chart:
fig, ax = plot_sensitivity(sens, figsize=(5, 3))
Comparing multiple plants
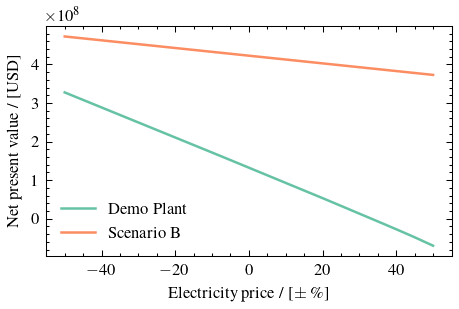
Pass a list of plants to sensitivity_data() to
plot all curves on the same axes:
sens_multi = sensitivity_data(
    plants=[plant, plant_b],
    parameter="electricity",
    metric="NPV",
    plus_minus_value=0.5,
)
fig, ax = plot_sensitivity(sens_multi)
Tornado diagrams
from openpytea.analysis import tornado_data
from openpytea.plotting import plot_tornado

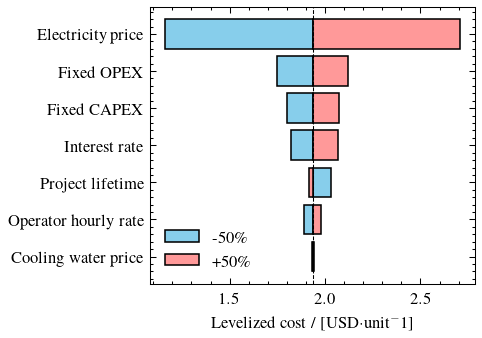
# Default metric is LCOP
td = tornado_data(plant=plant, plus_minus_value=0.5)
fig, ax = plot_tornado(td)

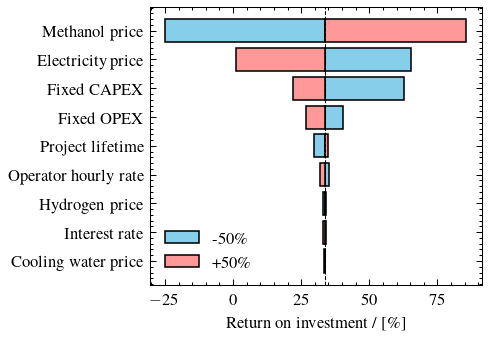
# Profit-oriented metric
td_roi = tornado_data(plant=plant, plus_minus_value=0.5, metric="ROI")
fig, ax = plot_tornado(td_roi)

fig.savefig("tornado.pdf")
|
|
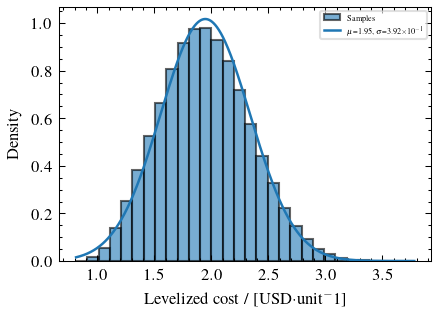
Monte Carlo histograms
from openpytea.analysis import monte_carlo
from openpytea.plotting import plot_monte_carlo

mc_results = monte_carlo(plant, num_samples=1_000_000, batch_size=10_000)

# Distribution of the LCOP
fig, ax = plot_monte_carlo(plant, metric="LCOP", bins=30)

fig.savefig("monte_carlo_lcop.pdf")
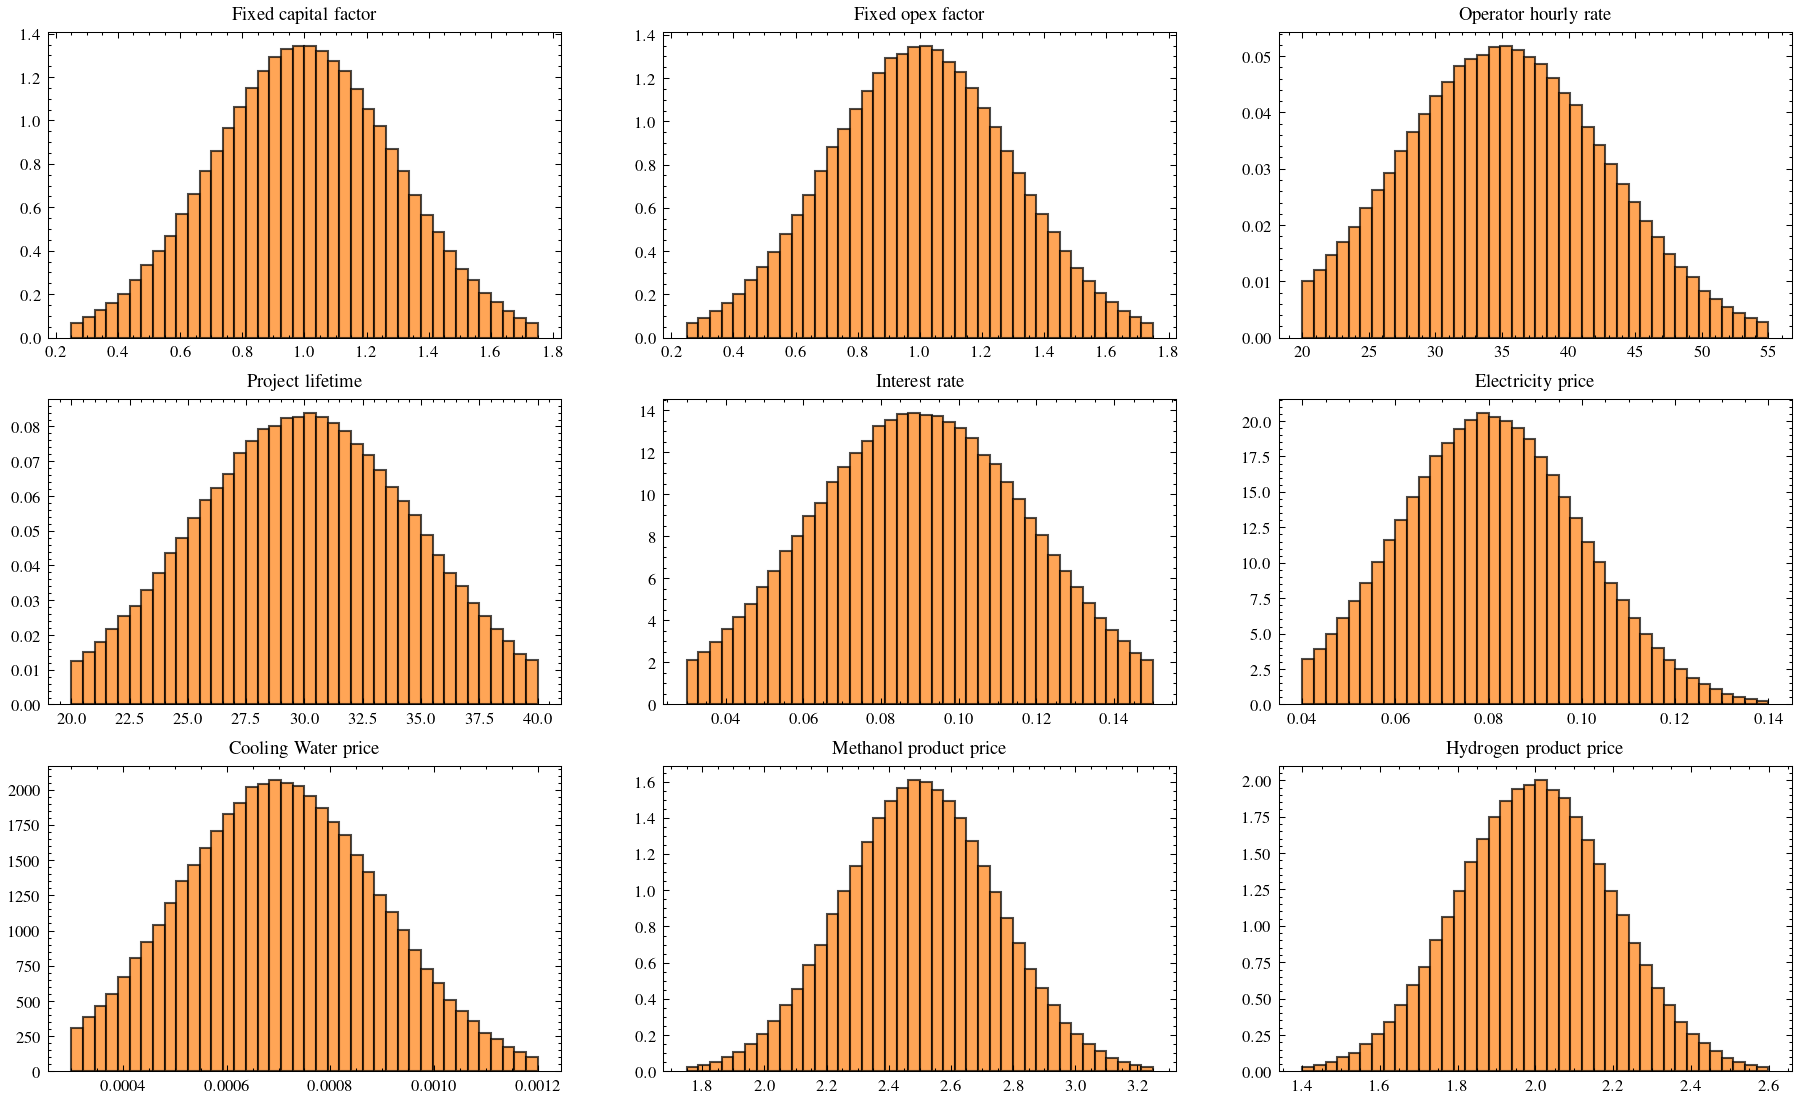
Visualizing input distributions
Use plot_monte_carlo_inputs() to verify that the
std/min/max settings produce the intended input distributions:
from openpytea.plotting import plot_monte_carlo_inputs

fig, axes = plot_monte_carlo_inputs(mc_results, bins=40)
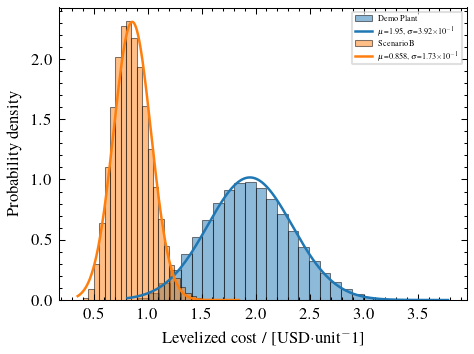
Comparing scenarios
from openpytea.plotting import plot_multiple_monte_carlo

mc_b = monte_carlo(plant_b, num_samples=1_000_000, batch_size=10_000)

fig, ax = plot_multiple_monte_carlo(
    data_list=[plant, plant_b],
    metric="LCOP",
    bins=30,
)
Saving figures
All functions return a (fig, ax) tuple. Use fig directly to save:
fig, ax = plot_stacked_bar(capex_data)
fig.savefig("capex.png", dpi=300, bbox_inches="tight")
fig.savefig("capex.pdf")   # vector format for publications
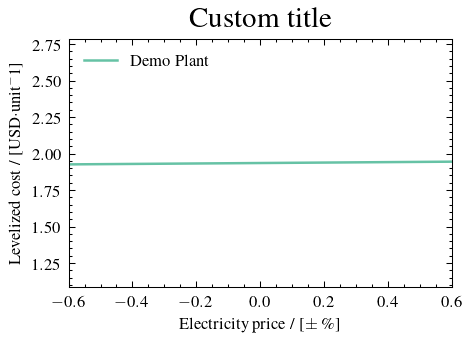
Customizing axes
You can modify the returned axes object with standard matplotlib calls:
fig, ax = plot_sensitivity(sens)
ax.set_title("Custom title", fontsize=14)
ax.set_xlim(-0.6, 0.6)
ax.legend(loc="upper left")
See also
openpytea.plotting— full API referenceopenpytea.analysis— data preparation functionsWalkthrough notebook — end-to-end worked example